Workflow Designer Overview
Workflow Designer Main Window
This section presents the main components of the Workflow Designer main window and explains how to use them. In the figure below, the main components are numbered. A key is provided in the table following the figure.
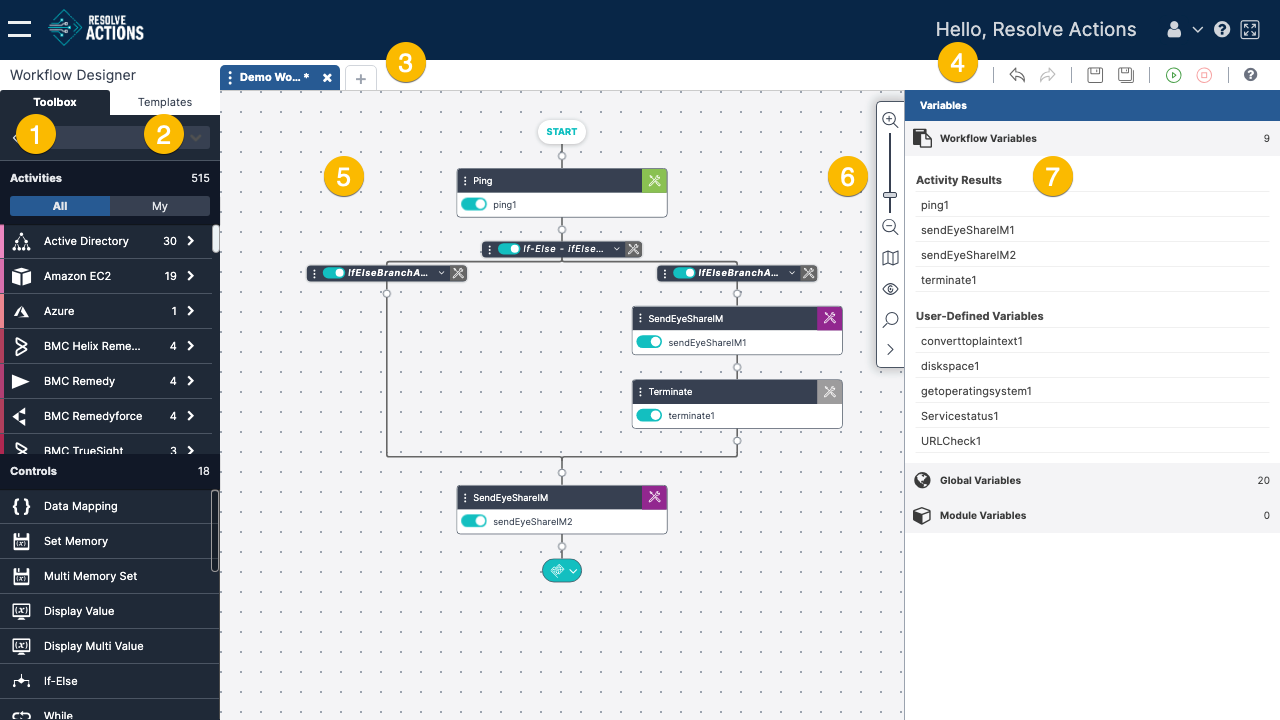
1—Toolbox
Lists all the activities and controls that you can use in your workflow. For more information, refer to Understanding the Toolbox.
2—Templates
Lists all the templates that you can add to your workflow. For more information, refer to Using the List of Templates.
3—Workflow tabs
List the names of the workflows that are currently open. Clicking the plus icon opens the Welcome screen, from which you can create or open an additional workflow.
Clicking the three dots opens a further menu that allows you to perform the following actions:
- Documentation—View and update description, tags, and notes
- Verify—Verify the workflow
- History—View revision history
- Export—Export the workflow
4—Designer toolbar
Provides one-click access to common actions related to building a workflow. For details, refer to The Designer Toolbar.
5—Canvas
The drawing board of the Workflow Designer.
6—Reference toolbar
Provides viewing tools (such as resizing) the workflow layout and searching for workflow components. For more information, refer to Navigating Through Your Workflow.
7—Variables sidebar
Provides quick access to the workflow's local variables, the global variables, and the module variables. For more information, see Creating a Data Flow.
Understanding the Toolbox
The Toolbox offers two classes of resources that you can use to build your workflows:
- Activities are operative actions that make up the workflow process. An activity can be deleting a folder, adding a user, retrieving CPU data, and so on. In the Toolbox, activities are grouped according to category. Each category is represented by an icon (on the left side of the activity row).
- Controls are functions or logic expressions that determine the direction in which the workflow progresses. Examples include conditions and If-else controls.
When you hover over an activity or a control, the following icons appear:
| Icon | Description |
|---|---|
| Toggle. Indicates that the activity or control has been removed from your Favorites list. For more information, see Building a Favorites List. | |
| Toggle. Indicates that the activity or control has been added to your Favorites list. For more information, see Building a Favorites List. | |
| Hovering over this icon displays a tooltip describing the activity or control. |
Both activities and controls can be added to the workflow by dragging and dropping them onto the canvas. For more information, refer to Adding Activities.
Building a Favorites List
For convenience, you can create a Favorites list in the Workflow Designer, so you can quickly access the activities and controls that you use most frequently.
To build a Favorites list:
- From the Toolbox, hover over the relevant activity or control and click the star icon.
The icon fills up and the resource is designated as a Favorite. - To view your Favorites list, at the top of the Activities list, click My.
Your Favorites are listed in alphabetical order. - To remove a resource from the Favorites list, hover over the resource and click the star icon again.
The selected resource is deleted from the Favorites list.
Using the List of Templates
Templates are sample workflows that provide a foundation for building workflows for specific scenarios. All available templates (both pre-built and those you customize) are listed in the Templates tab of the Workflow Designer.
Open the list of templates by clicking the Templates button in the upper left corner of the Designer. The list is organized according to category. The numbers on the right side of each row indicate the number of templates in that category.
Clicking New displays a list of templates that you created in the last 30 days. New pre-built templates included in recent Resolve Actions version updates also appear in this list.
Expanding a category opens a list of the templates included in that category. You can add a template to your workflow by dragging and dropping it onto the canvas.
The Designer Toolbar
This toolbar provides one-click access to actions that are frequently performed when building a workflow.
| Icon | Action | Description |
|---|---|---|
| Undo | Removes the last edit done to the workflow. | |
| Redo | Restores the change that was last removed using the Undo action. | |
| Save | Saves all changes made to the workflow since the last Save action. For details, refer to Saving Your Workflow. | |
| Save As | Allows you to save the current workflow as an additional workflow or as a template. For more information, refer to Saving Your Workflow. | |
| Set Variables | Allows you to set variables for the workflow that you're working on to either test or manually run it with actual values. For details, refer to Settings Variables in Workflows. | |
| Run | Executes the workflow. For more information, refer to Running Workflows. | |
| Abort | Stops execution of a running workflow. | |
| Help | Opens the online help for the Workflow Designer. |